Prepping / 1978 Wagoneer Front Dana 44 for a YJ
When I went looking for a 44 front end to swap into my YJ. I had heard a lot about Wagoneer 44’s due to their perfect width and very decent strength. A donor vehicle ended up being a 1978 Wagoneer with a 401 ccd AMC engine. This is the main reason that they used a Dana 44 front end in this truck…lots of torque from that motor coupled with the weight of that vehicle makes it obvious why it is a natural swap into a lightweight (by comparison) YJ.
Wagoneer 44 Stats:
-62.5” WMS to WMS (wheel mounting surface)
-30 spline shafts with 297 U-joints
-6 bolt but can be easily converted to 5X5.5 using Ford and Chevy parts.
-Standard Rotation
-Passenger side dump
-Perfect for up to 36” tires (in stock form)
I chose to keep the stock 6x5.5 bolt pattern on the Waggy 44 because I needed to change the 5x4.5 pattern on my Ford 8.8 rear axle anyways. A friend locally got me a deal on 1” 5x4.5 to 6x5.5 adapters that I would use to match the front bolt pattern. With the adapters installed my vehicle will have a 62.5” front end and a 61.75” rear width, which is perfect for the configuration I want. I figure with this combo along with my Dana 300 swap I will have a solid, sturdy vehicle that will be plenty strong to run my tire size. I plan on staying on my 35x15.5x15 Swamper SX’s, this is the good compromise between crawler and occasionally the get to work vehicle.
Years to look for Waggy front 44's:
>
> 75-79 are passenger side pumpkin, disk brake 62.5" WMS to WMS.
These
> years have the factory flat toppped knuckles Common ratios
> (2.72,3.08,3.54)
> 80-91 are driver side pumpkin, disk brake 62.5" WMS to WMS.
Common
> ratios (2.72,3.08,3.54)
>
> These axles are all stock 6 bolt and considered half ton.
> Note: Some 80 and newer, (up till 83-84) had a vacuum disconnect
for
> the two piece long side shaft. -STAY CLEAR OF THESE...you will notice
> the vacuum line going to the top of the pumpkin.
>
Teardown
When I first got my axle it was actually in pretty decent shape considering that it came out of a 1978 truck. Due to its age, and for future dependability I decided to completely disassemble and reassemble this axle. This serves two purposes, one to find any worn parts, bearings or seals that may need replacement but more importantly a teardown gives you first hand knowledge of the axle’s construction and assembly which can make a trail repair a lot easier to figure out.
As with every Jeep repair I do, my first step was to go to town with the liquid wrench spraying the heck out of the axle. Basically every bolt or nut should be soaked a few times over the course of a day. This saves on frustration and also the possibility of snapping bolts that are a pain to extract after. Been there…and I hate that snap sound!
Once that was done, disassembly was quite easy.
Disassembly
I removed the chrome dust covers from the hub housing and could see the
first retaining ring/nut, that was easy to remove by just using a flat
head screwdriver and a mallet turning it counter clockwise. Once the nut
was removed the drive flange and spring in behind it pops out, this puts
pressure on both the drive flange and the secondary retaining nut (looks
exactly the same as previous) that holds the hub and rotor to the spindle.
Remove the keyed lock ring and then the secondary retaining nut
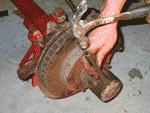


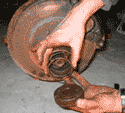

Then remove the brake caliper bolts and pull the calipers from the rotors.
The rotor and hub assembly should now be free from the spindle. Once the
rotors are off you will see 6 nuts that hold the spindle and dust covers
on the knuckles. Remove these and use a metal chisel to pry both the dust
cover and spindle. Then pull the drive shafts from the axle.


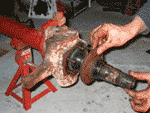

Now it’s time to remove the carrier along with the ring and pinion.
First you need to loosen the nut on the yoke so it can be removed from
the pinion. Once that is done flip the axle up and loosen the 4 bolts
holding the two retaining straps for the center section and pull the carrier.


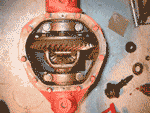


Then remove the pinion from the axle housing, this may take some persuasion.
Use a rubber mallet or a block of wood with a small sledgehammer. The
gear ratio that came with the Wagoneer 44 was 3.54 which was to low for
my tire size. My 8.8 has 4.10’s in it already, so I decided that
since I am going auto, 4:1 and for overall gas mileage 4.10’s seemed
ok for me. With this decided, I managed to find an entire Dana 44 center
section with 4.09 gears locally. I verified these gears by looking on
the side of the ring. There are a bunch of stamped numbers, the ones you
need to check are the last 2. On this center was stamped 45-11, which
means you divide 11 into 45 giving you 4.09

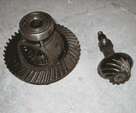


This is obviously the best gear swap you can do requiring the least amount of work, just pop out one center for another. If you were to get a ring and pinion set you would need to set the gears and shim them properly so the pinion sits right on the ring.
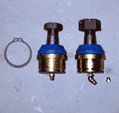
While it was apart I took the opportunity to have a close look at all the bearings for scoring and for general wear. As I had mentioned earlier, it was a low kms truck so everything looked decent enough to leave in there. There were a few things however that needed replacement, one being the inner seals for the driveshafts. I could tell these were shot by the oil soaked shafts. These are very simple to do and a must while everything is apart. Another replacement I did was the upper and lower ball joints for both sides of the axle. 2 of them were shot and they were the non-greaseable kind that really suck. I picked up new ones from UAP/Napa…$185 for all 4. The old ones needed to be pressed off and the new ones pressed on. The last thing was to repack the hubs with new grease before re-assembly. This is always good to do at least once a year to ensure prolonged hub life.
High Steering Setup – coming soon
The word jeep is used in reference to offroad vehicles and has no relationship to Dailmer Chrysler.
University of Jeep
